谷歌默认的SharedPreferences对多进程支持非常不友好,其自己也承认:
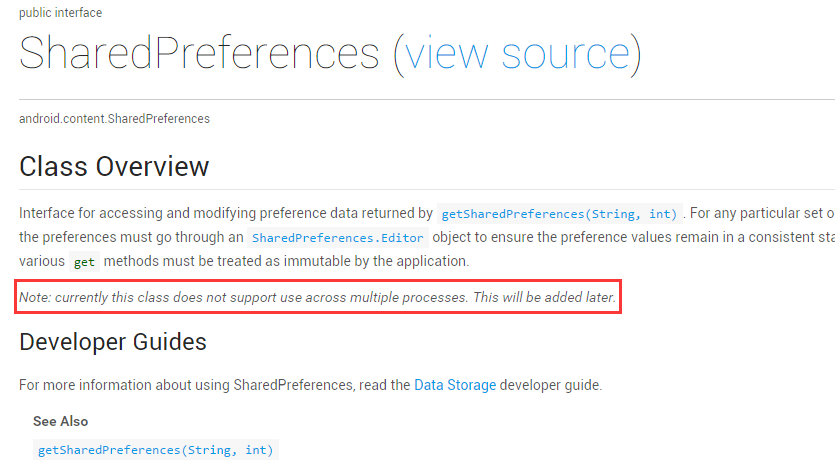
为啥支持不友好呢?去看一下源码:
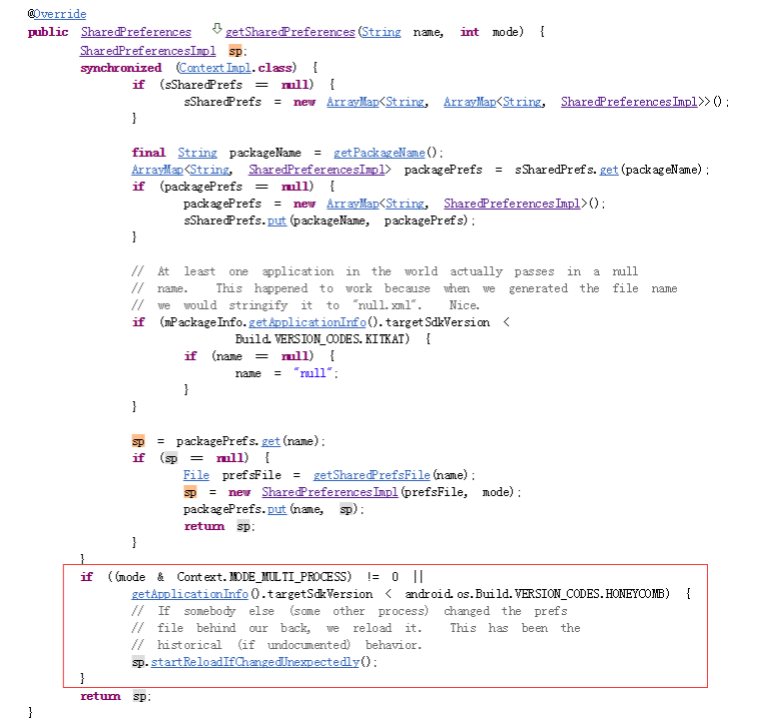
可以看到,谷歌对MODE_MULTI_PROCESS的处理是判断当前的SP对应的XML文件有没有什么异动(不是当前进程的改变),如异常的时间戳、大小等变化,如果有变化就重新加载该SP文件的数据,使得保证获取的数据保持在最新版本。
这样做的问题就是:
- 文件改动会引起多进程的频繁读取,降低效率
- 只能保证获取SP时的数据为最新,后续操作无法保证
针对这个问题,这边实现了一个跨进程友好的SharedPreferences。实现的原理就是通过Android中为跨进程通信而生的组件——ContentProvider。
基础的使用方式我们需要看看我们自定义的BaseApplication。(自定义的Application知识这边暂且不表)1
2
3
4
5
6
7
8
9
10
11
12
13
14
15
16
17
18
19
20
21
22
23public class BaseApplication extends Application {
private static BaseApplication instance;
public static BaseApplication getInstance() {
return instance;
}
@Override
public SharedPreferences getSharedPreferences(String name, int mode) {
return SPManager.getsInstance().getSharedPreferences(name, mode);
}
public SharedPreferences getSystemSharedPreferences(String name, int mode) {
return super.getSharedPreferences(name, mode);
}
@Override
public void onCreate() {
super.onCreate();
instance = this;
SPManager.getsInstance().init(this);
}
}
可以看到,在Application的onCreate里面做了我们的SPManager的初始化工作init(),这个init的主要工作是判断当前所在的进程是否是主进程。1
2
3
4
5
6
7
8
9
10
11
12
13
14
15
16public static void initProcessInfo(Context context) {
if (context == null)
return;
// get the name of current process
int pid = android.os.Process.myPid();
ActivityManager manager = (ActivityManager) context.getSystemService(Context.ACTIVITY_SERVICE);
for (ActivityManager.RunningAppProcessInfo info : manager.getRunningAppProcesses()) {
if (info.pid == pid) {
sProcessName = info.processName;
break;
}
}
sIsInMainProcess = MAIN_PROCESS.equals(sProcessName);
}
这边判断主进程的方式是比较字符串,主进程字符串简便起见,直接写死。当然也可以通过获取Manifest里面的package信息获取。这边赋值了一个最重要的静态变量——sIsInMainProcess。
重新回到BaseApplication,我们可以看到重写了getSharedPreferences方法,无缝得使这个项目中,通过Application获取SharedPreferences得到的都是我们这边的支持多进程的SP。当然,我们知道,项目中,SP的获取不止可以通过Application,也可以通过Activity,所以,我们也可以仿照这个,为工程定义一个BaseActivity,然后重写其getSharedPreferences方法,这边不具体阐述。而BaseApplication里面为啥要有一个getSystemSharedPreferences方法呢?卖个关子,后面说。
SPManager里面的getSharedPreferences具体如下:1
2
3
4
5
6
7
8
9
10
11
12
13
14
15
16
17
18
19
20
21
22
23
24
25
26public SharedPreferences getSharedPreferences(String name, int mode) {
if (TextUtils.isEmpty(name)) {
name = "null";
}
SharedPreferences sp = null;
Map<String, SharedPreferences> spMap = null;
if (Utils.sIsInMainProcess) {
spMap = mLocalSPs; // local的使用多一点,放在if里面
} else {
spMap = mRemoteSPs;
}
sp = spMap.get(name);
if (sp == null) {
synchronized (spMap) {
sp = spMap.get(name);
if (sp == null) {
sp = new SPProxy(mContext, name, mode);
spMap.put(name, sp);
}
}
}
return sp;
}
这边有个小技巧,就是为主进程和子进程分别通过ConcurrentHashMap保存了SP的引用,方便下次获取SP。我们可以看到,真正得到的SharedPreferences是我们的SPProxy对象。1
2
3
4
5
6
7
8
9
10
11
12
13
14
15
16
17
18public class SPProxy implements SharedPreferences {
private IKeyValueOperator mSPOperator;
private EditorImpl mEditor;
private Set<OnSharedPreferenceChangeListener> mListeners;
public SPProxy(WeakReference<Context> context, String name, int mode) {
if (Utils.sIsInMainProcess) {
mSPOperator = new DefaultSPOperator(context.get(), name, mode);
} else {
mSPOperator = new ContentProviderOperator(context, name);
}
mEditor = new EditorImpl();
}
...
...
...
}
SPProxy中有两个重要的变量,mSPOperator和mEditor,而mSPOperator尤为重要,它实现了我们真正通过SP存取数据时的操作。这边可以清晰的看到,主进程和子进程的mSPOperator是不同的。主进程是DefaultSPOperator,而子进程我们看到了熟悉的字眼ContentProviderOperator,对,就是ContentProvider。1
2
3
4
5
6
7
8
9
10
11
12
13
14
15
16
17
18
19
20
21
22
23
24
25
26
27
28
29
30
31
32
33
34
35
36
37
38
39
40
41
42
43
44
45
46
47
48
49
50
51
52
53
54
55
56
57
58
59
60
61
62
63
64public class ContentProviderOperator implements IKeyValueOperator {
private static final String BASE_URI = "content://com.multiprocesssp.sharedpreferences.SPContentProvider";
private static final String DEFAULT_NAME = "default";
private WeakReference<Context> mContext;
private Uri mUri;
public ContentProviderOperator(WeakReference<Context> context, String name) {
mContext = context;
String uriStr = BASE_URI + "/params?" + Constants.KEY_FILE + "=" + (TextUtils.isEmpty(name) ? DEFAULT_NAME :
name);
mUri = Uri.parse(uriStr);
}
...
@Override
public Object read(int valueType, String key, Object defaultValue) {
Context context;
if (mContext == null || (context = mContext.get()) == null) {
return defaultValue;
}
Cursor cursor = null;
try {
cursor = context.getContentResolver().query(mUri, new String[]{
Constants.KEY_KEY, key,
Constants.KEY_VALUE_TYPE, valueType + "",
Constants.KEY_DEFAULT, defaultValue + ""
}, null, null, null);
} catch (Exception e) {
e.printStackTrace();
}
if (cursor == null) {
return defaultValue;
}
try {
if (!cursor.moveToFirst()) {
return defaultValue;
} else {
Object result = getDataFromCursor(cursor, valueType);
if (result != null) {
return result;
} else {
return defaultValue;
}
}
} catch (Throwable t) {
return defaultValue;
} finally {
try {
cursor.close();
} catch (Exception e) {
e.printStackTrace();
}
}
}
...
...
}
可以看到,通过ContentProviderOperator进行SP数据操作实际上是通过我们这边的mUri来的。我们知道,ContentProvider的原理就是封装自己的数据操作,然后向外界暴露一个Uri。换句话说,在子进程中的SP数据操作就是通过主进程暴露出来的ContentProvider的Uri来进行的。这个Uri就是”content://com.multiprocesssp.sharedpreferences.SPContentProvider”。
原来如此,原来我们跨进程的SharedPreferences基本原理就是子进程读取SP的时候,通过主进程暴露的ContentProvider的Uri来对主进程中的SP进行读取。
再来看看主进程中定义的ContentProvider。1
2
3
4
5
6
7
8
9
10
11
12
13
14
15
16
17
18
19
20
21
22
23
24
25
26
27
28
29
30
31
32
33
34
35
36
37
38
39
40
41
42
43
44
45
46
47
48
49
50
51
52
53
54
55
56
57
58
59
60
61
62
63
64
65
66
67
68
69public class SPContentProvider extends ContentProvider {
...
@Override
public Cursor query(Uri uri, String[] projection, String selection, String[] selectionArgs, String sortOrder) {
String name = getParam(uri, Constants.KEY_FILE);
String key = NO_SUCH_KEY;
int type = -1;
String defaultValue = null;
for (int i = 0, count = projection.length; i < count; i++) {
if (Constants.KEY_KEY.equals(projection[i])) {
if (++i < count)
key = projection[i];
} else if (Constants.KEY_VALUE_TYPE.equals(projection[i])) {
if (++i < count)
type = Integer.parseInt(projection[i]);
} else if (Constants.KEY_DEFAULT.equals(projection[i])) {
if (++i < count)
defaultValue = projection[i];
}
}
if (NO_SUCH_KEY.equals(key) || type == -1) {
return null;
}
MatrixCursor cursor = new MatrixCursor(MOCK_COLUMNS);
Object value = null;
SharedPreferences sp = SPManager.getsInstance().getSharedPreferences(name, Context.MODE_PRIVATE);
try {
switch (type) {
case Constants.VALUE_TYPE_INTEGER:
value = sp.getInt(key, Integer.parseInt(defaultValue));
break;
case Constants.VALUE_TYPE_LONG:
value = sp.getLong(key, Long.parseLong(defaultValue));
break;
case Constants.VALUE_TYPE_FLOAT:
value = sp.getFloat(key, Float.parseFloat(defaultValue));
break;
case Constants.VALUE_TYPE_BOOLEAN:
// boolean has to be converted to an integer cursor
value = sp.getBoolean(key, Boolean.parseBoolean(defaultValue)) ? 1 : 0;
break;
case Constants.VALUE_TYPE_STRING:
value = sp.getString(key, defaultValue);
break;
case Constants.VALUE_TYPE_ANY:
// return something to hint that key exists
value = sp.contains(key) ? 0 : null;
break;
}
if (value != null) {
cursor.addRow(new Object[]{
value
});
}
} catch (Exception e) {
}
return cursor;
}
...
...
}
以query方法举例,可以看到,在主进程的SP操作,又回到了SPManager.getsInstance().getSharedPreferences(name, Context.MODE_PRIVATE);而我们上面可以看到,这个方法得到的就是主进程的SPProxy,在主进程中,返回的就是系统默认的SharedPreferences,而这个系统默认的SharedPreferences我们是通过BaseApplication里面的getSystemSharedPreferences获取到的,在Utils类里面。所以,这里,才是所有的进程真正操作SharedPreferences数据的地方。1
2
3
4
5
6
7
8
9
10
11
12
13
14
15
16
17
18
19
20
21
22
23
24
25
26
27
28
29
30
31public class Utils {
...
...
...
public static SharedPreferences getSystemSP(Context context, String name, int mode) {
/*
* 这边直接调context.getSharedPreferences(name, mode)的话,
* 会调用BaseApplication里面的getSharedPreferences,然后一层一层调回来,
* 引起无限循环
*/
SharedPreferences sp = null;
try {
Class<?> clazz = Class.forName("com.multiprocesssp.base.BaseApplication");
Method method = clazz.getDeclaredMethod("getSystemSharedPreferences", new Class[]{String.class, int.class});
sp = (SharedPreferences) method.invoke(context, new Object[]{name, mode});
} catch (ClassNotFoundException e) {
e.printStackTrace();
} catch (NoSuchMethodException e) {
e.printStackTrace();
} catch (IllegalArgumentException e) {
e.printStackTrace();
} catch (IllegalAccessException e) {
e.printStackTrace();
} catch (InvocationTargetException e) {
e.printStackTrace();
}
return sp;
}
}
至此,大体将跨进程的ContentProvider原理讲清了,具体源码可以参考MultiProcessSharedPreferences
注意
- ContentProvider的实现类要在manifest中声明,进程启动的时候,会执行该类的onCreate()方法。
- 多进程的声明 android:process=”:XXX”,这个XXX不能为数字。