简介
Github上有一个很炫酷的动画开源项目——ExplosionField。
MIUI的一些版本卸载APP的特效就是用的这个爆炸。
Explosion不止效果惊人,代码也极其简洁精妙,核心代码加起来还不到300行,让人忍不住一窥。
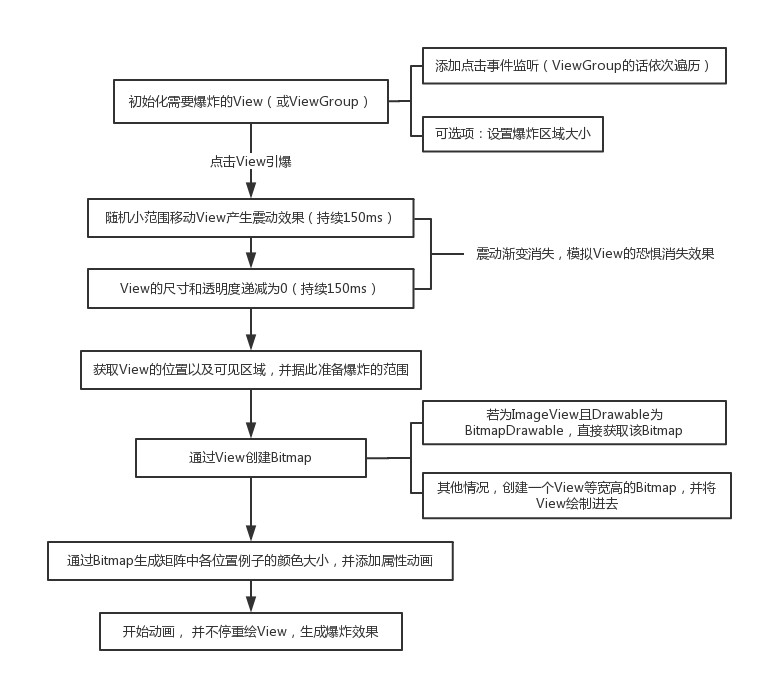
流程图
代码浅析
ExplosionField
ExplosionField是一个View,这个View的作用就是用来绘制爆炸效果。
它提供了一个静态的初始化方法——attach2Window:1
2
3
4
5
6
7public static ExplosionField attach2Window(Activity activity) {
ViewGroup rootView = (ViewGroup) activity.findViewById(Window.ID_ANDROID_CONTENT);
ExplosionField explosionField = new ExplosionField(activity);
rootView.addView(explosionField, new ViewGroup.LayoutParams(ViewGroup.LayoutParams.MATCH_PARENT,
ViewGroup.LayoutParams.MATCH_PARENT));
return explosionField;
}
这个方法在初始化的同时,将初始化得到的ExplosionField作为一个子View添加到了Activity的root上面。
因为Activity中的任何View都可以实现爆炸效果,所以,我们的ExplosionField的LayoutParams属性都被设置为MATCH_PARENT,这样爆炸产生的例子就能绘制在整个Activity上面了。
可以看到,这边用Window.ID_ANDROID_CONTENT来替代常用的android.R.id.content。
在MainActivity里面看到,每个View都被设置了点击事件,点击后就会调用mExplosionField.explode(v),触发了爆炸流程。
爆炸范围的获取
我们看explode的前几行:1
2
3
4
5
6
7
8
9
10Rect r = new Rect();
// 获取需要爆炸的View的全局可见区域
view.getGlobalVisibleRect(r);
int[] location = new int[2];
// 获取ExplosionField在屏幕中的坐标
getLocationOnScreen(location);
// 根据ExplosionField在屏幕中的坐标平移爆炸View的可视区域
r.offset(-location[0], -location[1]);
// 扩展爆炸View的可视区域,这个区域最终用来显示四散的粒子
r.inset(-mExpandInset[0], -mExpandInset[1]);
这几行代码获取了需要爆炸的View位置以及可见区域,再通过Rect的offset方法和inset方法定义了View爆炸时粒子的动画范围。
View的震颤
苹果的APP删除时,都会有一个颤抖效果,以表达APP的恐惧之情。
估计作者受了启发,View爆炸前都先让它震颤一会儿。
震颤的代码相当简单:1
2
3
4
5
6
7
8
9
10
11
12
13
14
15int startDelay = 100;
ValueAnimator animator = ValueAnimator.ofFloat(0f, 1f).setDuration(150);
animator.addUpdateListener(new ValueAnimator.AnimatorUpdateListener() {
Random random = new Random();
@Override
public void onAnimationUpdate(ValueAnimator animation) {
view.setTranslationX((random.nextFloat() - 0.5f) * view.getWidth() * 0.05f);
view.setTranslationY((random.nextFloat() - 0.5f) * view.getHeight() * 0.05f);
}
});
animator.start();
view.animate().setDuration(150).setStartDelay(startDelay).scaleX(0f).scaleY(0f).alpha(0f).start();
先设置了一个持续150ms的动画,这个动画是让View随机移动,同时移动x和y,非常简单,几行代码就可以让一个View震啊震。
震动了100ms后(startDelay变量控制),将View的scale和alpha值动态减为0,实现了隐藏效果。
两个动画叠加,就产生了View的震颤动画。
根据View创建Bitmap
我们可以看到,爆炸效果是将整个View分割成一个一个小粒子再四散,要实现这个效果,我们首先需要获取View对应的Bitmap。
这个过程通过Utils类的createBitmapFromView实现。
如果VIew是ImageView而且对应的Drawable是BitmapDrawable的话,就可以直接获取这个View对应的Bitmap:1
2
3
4
5
6if (view instanceof ImageView) {
Drawable drawable = ((ImageView) view).getDrawable();
if (drawable != null && drawable instanceof BitmapDrawable) {
return ((BitmapDrawable) drawable).getBitmap();
}
}
别的情况下,获取一个Bitmap的过程就稍微一点复杂了:
- 新建一个Canvas
- 新建一个跟View等宽高的空Bitmap
- 将空Bitmap设为Canvas的底布
- 将View绘制到Canvas上面
- 将Canvas的底布清空
这个过程一走完,我们的Bitmap就已经成为了View的模样。
当然,绘制之前要清掉View的焦点,因为焦点可能会改变一个View的UI状态。
同时,Canvas用的是静态变量,这样做的好处是节省了每次创建绘制环境的开销。1
2
3
4
5
6
7
8
9
10
11view.clearFocus();
Bitmap bitmap = createBitmapSafely(view.getWidth(), view.getHeight(), Bitmap.Config.ARGB_8888, 2);
if (bitmap != null) {
synchronized (sCanvas) {
Canvas canvas = sCanvas;
canvas.setBitmap(bitmap);
view.draw(canvas);
canvas.setBitmap(null);
}
}
在根据View获取Bitmap的过程中,作者还考虑到了OOM的情况,所以封装了一个createBitmapSafely方法。
如果出现了OOM的情况,就主动调用系统的gc方法,然后重新尝试绘制。
同时,为了避免无限尝试,还设定了一个retryCount的变量。1
2
3
4
5
6
7
8
9
10
11
12private static Bitmap createBitmapSafely(int width, int height, Bitmap.Config config, int retryCount) {
try {
return Bitmap.createBitmap(width, height, config);
} catch (OutOfMemoryError e) {
e.printStackTrace();
if (retryCount > 0) {
System.gc();
return createBitmapSafely(width, height, config, retryCount - 1);
}
return null;
}
}
在通过View获取Bitmap的过程中,我们看到了作者深厚的代码底蕴,除了对各系统API的精准使用,还极其注意细节,避免实际应用中出现的各种各样bug。
爆炸动画触发
上面的各项准备工作完成后,就要触发真正的爆炸效果了:1
2
3
4
5
6
7
8
9
10
11
12
13public void explode(Bitmap bitmap, Rect bound, long startDelay, long duration) {
final ExplosionAnimator explosion = new ExplosionAnimator(this, bitmap, bound);
explosion.addListener(new AnimatorListenerAdapter() {
@Override
public void onAnimationEnd(Animator animation) {
mExplosions.remove(animation);
}
});
explosion.setStartDelay(startDelay);
explosion.setDuration(duration);
mExplosions.add(explosion);
explosion.start();
}
这只是启动了爆炸动画,启动的过程中,我们看到了有一个容器变量——mExplosions。
mExplosions用来保存ExplosionAnimator,因为控件支持多个View同时爆炸,所以要把每个View对应的爆炸动画保存起来,动画结束后再从mExplosions中移除。
爆炸动画类
ExplosionAnimator继承了ValueAnimator,是整个爆炸效果的核心。
先看其构造方法:1
2
3
4
5
6
7
8
9
10
11
12
13
14
15
16
17
18public ExplosionAnimator(View container, Bitmap bitmap, Rect bound) {
mPaint = new Paint();
mBound = new Rect(bound);
int partLen = 15;
mParticles = new Particle[partLen * partLen];
Random random = new Random(System.currentTimeMillis());
int w = bitmap.getWidth() / (partLen + 2);
int h = bitmap.getHeight() / (partLen + 2);
for (int i = 0; i < partLen; i++) {
for (int j = 0; j < partLen; j++) {
mParticles[(i * partLen) + j] = generateParticle(bitmap.getPixel((j + 1) * w, (i + 1) * h), random);
}
}
mContainer = container;
setFloatValues(0f, END_VALUE);
setInterpolator(DEFAULT_INTERPOLATOR);
setDuration(DEFAULT_DURATION);
}
可以看到,构造函数里面,把我们之前View对应的Bitmap分成了1717的矩阵,同时,取中间的1515作为爆炸时的粒子。
每个位置粒子的颜色,通过bitmap.getPixel((j + 1) w, (i + 1) h)获取。
ExplosionAnimator重载了start()方法:1
2
3
4
5Override
public void start() {
super.start();
mContainer.invalidate(mBound);
}
这个mContainer就是我们的ExplosionField,我们再看看看ExplosionField的draw方法:1
2
3
4
5
6
7@Override
protected void onDraw(Canvas canvas) {
super.onDraw(canvas);
for (ExplosionAnimator explosion : mExplosions) {
explosion.draw(canvas);
}
}
原来又调回了ExplosionAnimator,调用了ExplosionAnimator的draw方法:1
2
3
4
5
6
7
8
9
10
11
12
13
14
15public boolean draw(Canvas canvas) {
if (!isStarted()) {
return false;
}
for (Particle particle : mParticles) {
particle.advance((Float) getAnimatedValue());
if (particle.alpha > 0f) {
mPaint.setColor(particle.color);
mPaint.setAlpha((int) (Color.alpha(particle.color) * particle.alpha));
canvas.drawCircle(particle.cx, particle.cy, particle.radius, mPaint);
}
}
mContainer.invalidate();
return true;
}
这段代码,根据Animation的value,绘制了例子的位置,通过有调用mContainer.invalidate(),刷新了View。
这样就形成了一个递归,不停的刷新View,重绘例子,一直到动画完成,isStarted()变为false,爆炸效果就完成了。
粒子绘制
作者定义了一个粒子类——Particle。
这个类的生成及动画过程中的绘制方法,我没看懂,作者也没有多加解释。
爆炸过程中,粒子如烟花般四散,这个过程,没有深厚的动画经验是无法写出,我敢肯定,作者不是普通的应用开发者,肯定有游戏相关开发经验。
其他
这个开源库的一些变量可以单独提取,成为一个设置类,使动画效果可控,例如:1
2
3
4
5
6
7
8
9
10
11
12public class ExplosionSetting {
public long shakeAndShadeDuration = 150; //震动及其渐变时长 毫秒
public float shakeRange =0.05f; //震动幅度
public long explosionDuration =0x400; //爆炸时长
public int partLen=15; //矩阵长宽,个数:粒子*粒子
public int expandInset=10; //爆炸范围
public int radius = 2; //粒子半径
public ExplosionSetting(){
}
}
国内有个同行根据源码,写出了通俗易懂的自己的例子,也很不错。
学习ExplosionField之粒子破碎效果