简介
一个Window就是一个包含唯一的View树结构的矩形区域。
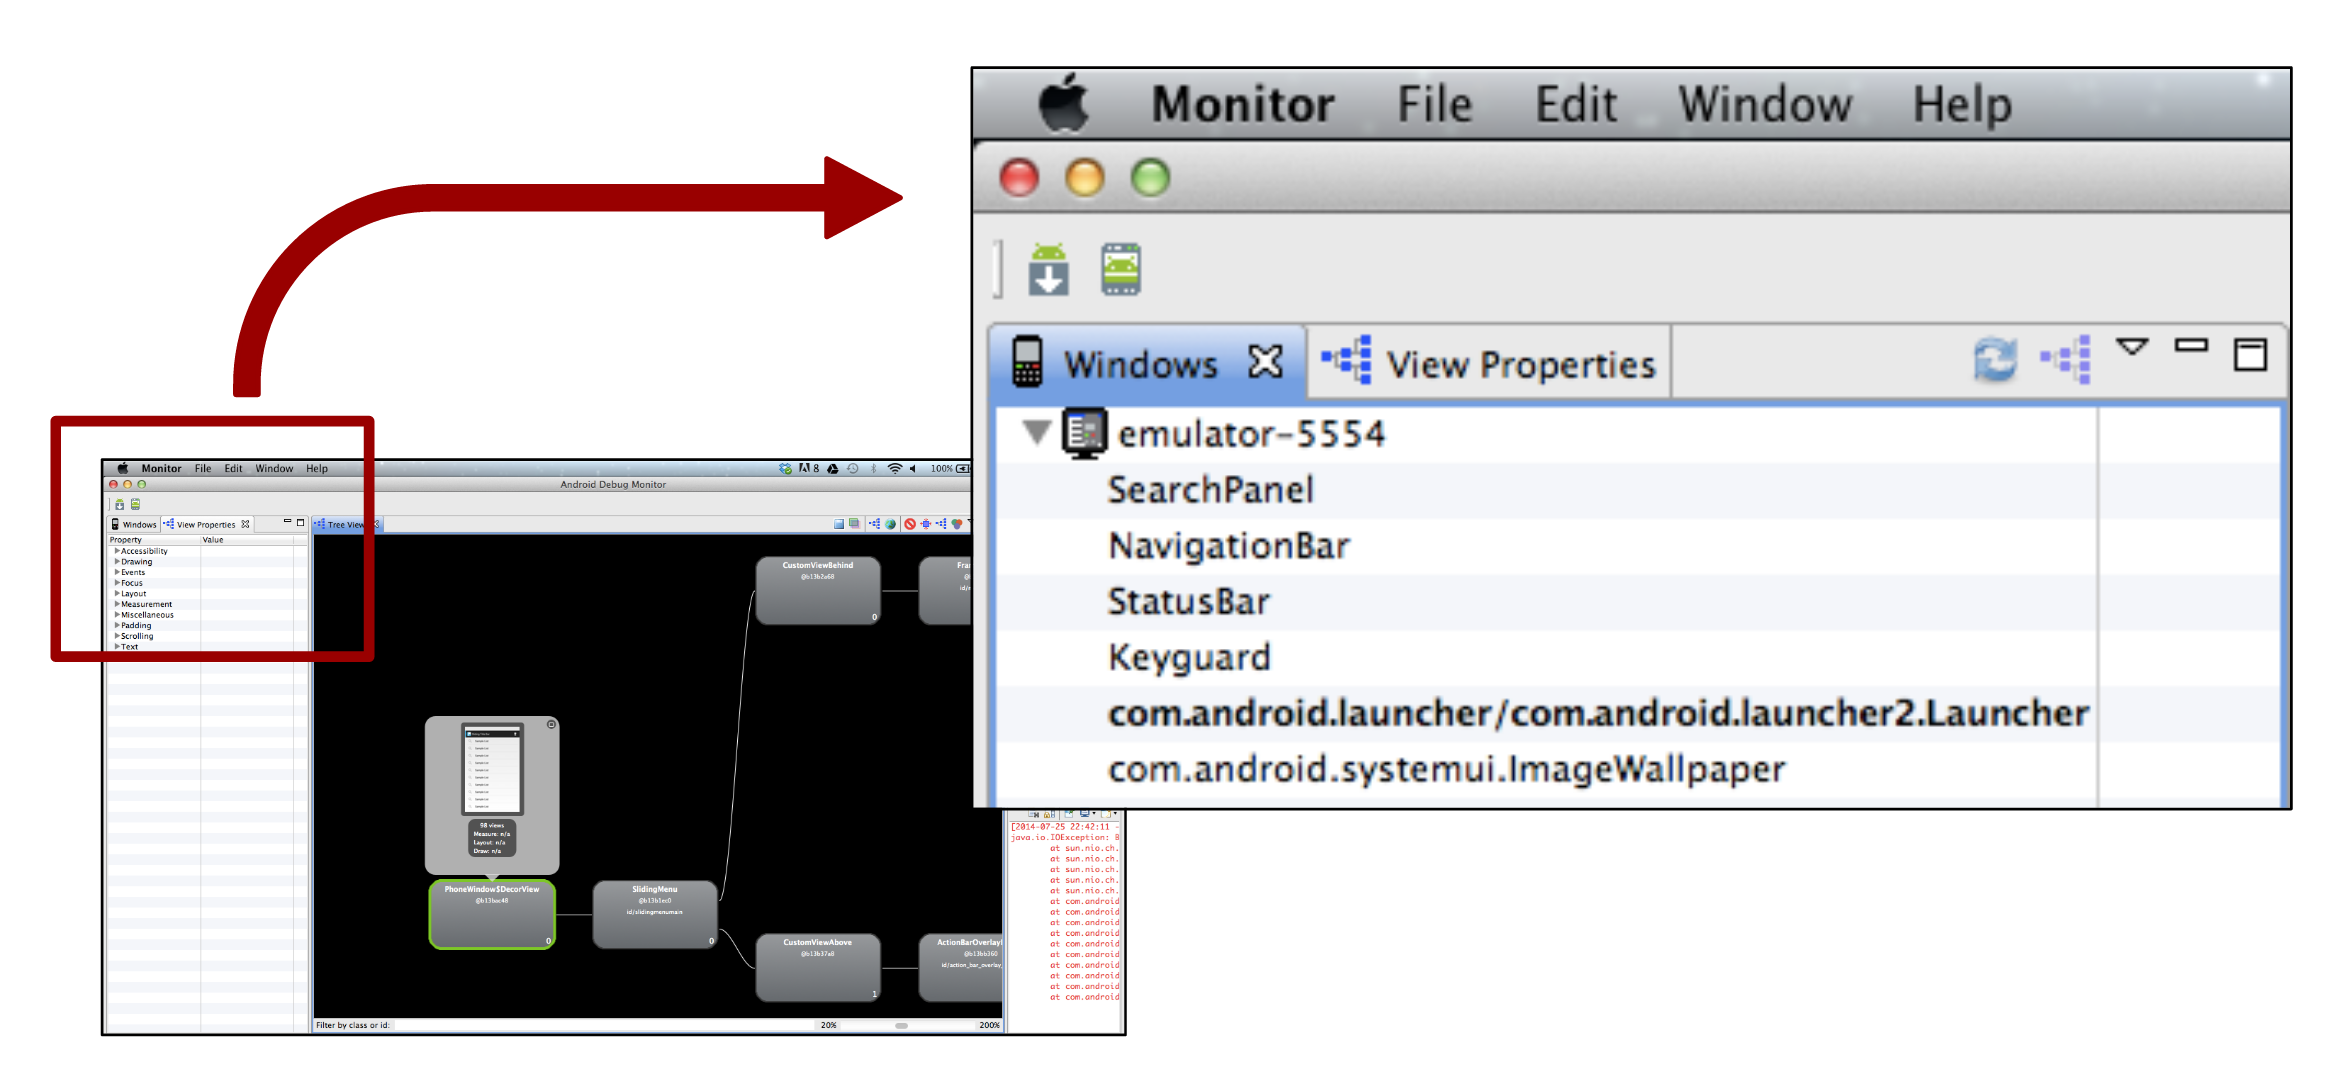
下面这张图告诉我们,一个屏幕中可能有多个Window。
我们可以通过Hierarchy Viewer来查看当前的Window,或者通过adb命令:1
adb shell dumpsys window

关于Window,Android架构师Dianne Hackborn层有过一段描述
A Surface is an object holding pixels that are being composited to the screen. Every window you see on the screen (a dialog, your full-screen activity, the status bar) has its own surface that it draws in to, and Surface Flinger renders these to the final display in their correct Z-order. A surface typically has more than one buffer (usually two) to do double-buffered rendering: the application can be drawing its next UI state while the surface flinger is compositing the screen using the last buffer, without needing to wait for the application to finish drawing.
A window is basically like you think of a window on the desktop. It has a single Surface in which the contents of the window is rendered. An application interacts with the Window Manager to create windows; the Window Manager creates a Surface for each window and gives it to the application for drawing. The application can draw whatever it wants in the Surface; to the Window Manager it is just an opaque rectangle.
A View is an interactive UI element inside of a window. A window has a single view hierarchy attached to it, which provides all of the behavior of the window. Whenever the window needs to be redrawn (such as because a view has invalidated itself), this is done into the window’s Surface. The Surface is locked, which returns a Canvas that can be used to draw into it. A draw traversal is done down the hierarchy, handing the Canvas down for each view to draw its part of the UI. Once done, the Surface is unlocked and posted so that the just drawn buffer is swapped to the foreground to then be composited to the screen by Surface Flinger.
A SurfaceView is a special implementation of View that also creates its own dedicated Surface for the application to directly draw into (outside of the normal view hierarchy, which otherwise must share the single Surface for the window). The way this works is simpler than you may expect – all SurfaceView does is ask the window manager to create a new window, telling it to Z-order that window either immediately behind or in front of the SurfaceView’s window, and positioning it to match where the SurfaceView appears in the containing window. If the surface is being placed behind the main window (in Z order), SurfaceView also fills its part of the main window with transparency so that the surface can be seen.
A Bitmap is just an interface to some pixel data. The pixels may be allocated by Bitmap itself when you are directly creating one, or it may be pointing to pixels it doesn’t own such as what internally happens to hook a Canvas up to a Surface for drawing. (A Bitmap is created and pointed to the current drawing buffer of the Surface.)
Window结构

基础类
Window类
抽象类,提供了一套耳熟能详的通用API。1
2
3
4
5
6
7
8
9
10
11
12
13
14
15
16
17
18
19
20
21
22
23
24
25
26
27
28
29
30
31
32
33
34
35
36
37
38
39public abstract class Window {
...
private final Context mContext;
private TypedArray mWindowStyle;
...
public Window(Context context) {
mContext = context;
}
public final Context getContext() {
return mContext;
}
public final TypedArray getWindowStyle() {
synchronized (this) {
if (mWindowStyle == null) {
mWindowStyle = mContext.obtainStyledAttributes(
com.android.internal.R.styleable.Window);
}
return mWindowStyle;
}
}
public View findViewById(int id) {
return getDecorView().findViewById(id);
}
public abstract View getDecorView();
public abstract void setTitle(CharSequence title);
public abstract void setContentView(int layoutResID);
public abstract void setBackgroundDrawable(Drawable drawable);
...
}
PhoneWindow类
PhoneWindow类是Window类的具体实现,主要工作是封装了DecorView,并通过操作DecorView具体实现了窗口的操作接口。1
2
3
4
5
6
7
8
9
10
11
12
13
14
15
16
17
18
19
20
21
22
23
24
25
26
27
28
29
30
31
32
33
34
35
36
37
38
39
40
41
42
43
44
45
46
47
48
49
50
51
52
53public class PhoneWindow extends Window implements MenuBuilder.Callback {
...
// This is the top-level view of the window, containing the window decor.
private DecorView mDecor;
// This is the view in which the window contents are placed. It is either
// mDecor itself, or a child of mDecor where the contents go.
private ViewGroup mContentParent;
...
private LayoutInflater mLayoutInflater;
private TextView mTitleView;
...
public void setTitle(CharSequence title) {
if (mTitleView != null) {
mTitleView.setText(title);
} else if (mActionBar != null) {
mActionBar.setWindowTitle(title);
}
mTitle = title;
}
...
public void setContentView(int layoutResID) {
	if (mContentParent == null) {
		installDecor();
	} else {
		mContentParent.removeAllViews();
	}
	mLayoutInflater.inflate(layoutResID, mContentParent);
	final Callback cb = getCallback();
	f (cb != null && !isDestroyed()) {
		cb.onContentChanged();
	}
}
...
public final void setBackgroundDrawable(Drawable drawable) {
if (drawable != mBackgroundDrawable || mBackgroundResource != 0) {
mBackgroundResource = 0;
mBackgroundDrawable = drawable;
if (mDecor != null) {
mDecor.setWindowBackground(drawable);
}
}
}
}
DecorView类
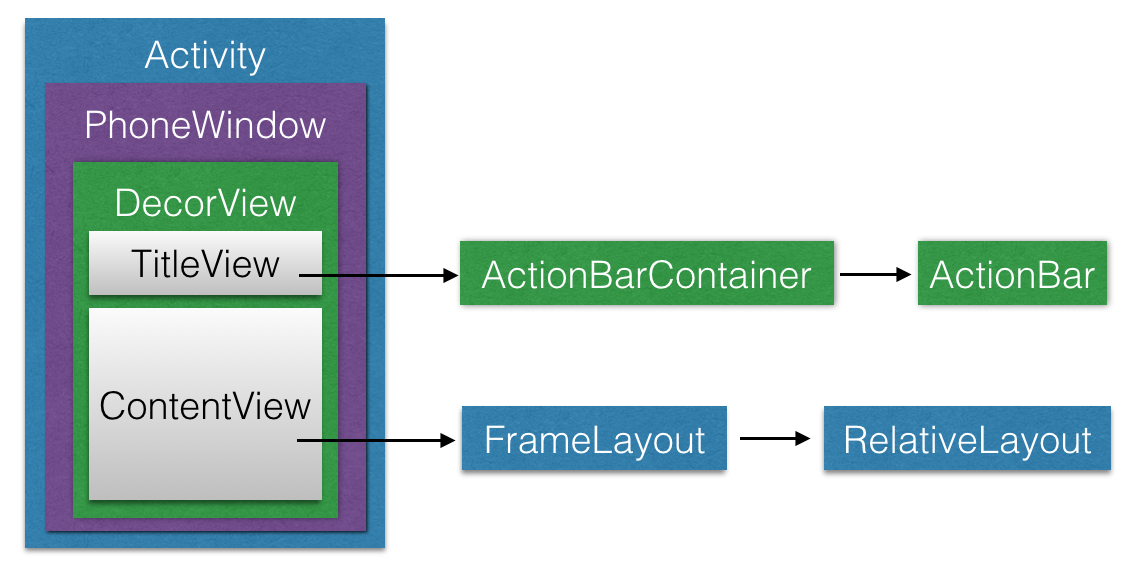
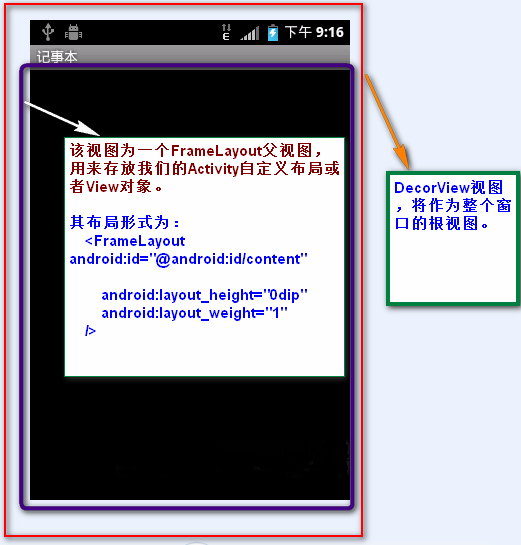
DecorView类是PhoneWindow类的内部类。该类是FrameLayout的子类,通过在DecorView里面添加Title,添加Title上的滚动条,添加我们自定义的Content,才最终展示了我们看到的完整的窗口。它默认会包含一个灰色的标题栏,然后在标题栏下边会包含一个空白区域用来当用户调用setContentView的时候放置用户View,并传递事件。
一言概之,DecorView是所有应用窗口的根View。我们在Manifest中设置的Theme或者在PhoneWindow设置的Flags,来确定DecorView的Layout。
setContentView过程
我们都知道,在Activity的onCreate()方法里面调用setContentView()方法会设置整个Activity的布局。这里,我们来看一下setContentView(intresId)方法。
Activity中:1
2
3
4
5
6
7
8
9
10public void setContentView(int layoutResID) {
getWindow().setContentView(layoutResID);
initActionBar();
}
...
public Window getWindow() {
return mWindow; //Window对象,本质上是一个PhoneWindow对象
}
PhoneWindow类中:1
2
3
4
5
6
7
8
9
10
11
12public void setContentView(int layoutResID) {
if (mContentParent == null) {
installDecor();
} else {
mContentParent.removeAllViews();
}
mLayoutInflater.inflate(layoutResID, mContentParent);
final Callback cb = getCallback();
f (cb != null && !isDestroyed()) {
cb.onContentChanged();
}
}
首先根据mContentParent是否为空来判断是否第一次调用setContentView()。如果第一次调用,就去调installDecor()方法,否则就移除mContentParent里面的所有子View。然后就将我们的资源文件通过LayoutInflater对象转换为View树,并且添加至mContentParent视图中。
这段代码也就解释了为什么在应用程序里,我们可以多次调用setContentView()来显示我们的界面。
再来看看installDecor()方法:1
2
3
4
5
6
7
8
9
10
11
12
13
14private void installDecor() {
if (mDecor == null) {
//mDecor为空,则创建一个Decor对象
mDecor = generateDecor();
mDecor.setDescendantFocusability(ViewGroup.FOCUS_AFTER_DESCENDANTS);
mDecor.setIsRootNamespace(true);
}
if (mContentParent == null) {
//generateLayout()方法会根据窗口的风格修饰,选择对应的修饰布局文件
//并且将id为content(android:id="@+id/content")的FrameLayout赋值给mContentParent
mContentParent = generateLayout(mDecor);
//...
}
首先,会判断mDecor是否为空。如果是空的话,就会去创建一个DecorView。上面说过DecorView是FrameLayout的子类,所以,它也是一个ViewGroup。
接着就要去创建mContentParent了,这个过程通过generateLayout()方法完成。1
2
3
4
5
6
7
8
9
10
11
12
13
14
15
16
17
18
19
20
21
22
23
24
25
26
27
28
29
30
31
32
33
34
35
36
37
38
39
40
41
42protected ViewGroup generateLayout(DecorView decor) {
// Apply data from current theme.
//...1、根据requestFreature()和Activity节点的android:theme="" 设置好 features值
//2 根据设定好的 features值,即特定风格属性,选择不同的窗口修饰布局文件
int layoutResource; //窗口修饰布局文件
int features = getLocalFeatures();
// System.out.println("Features: 0x" + Integer.toHexString(features));
if ((features & ((1 << FEATURE_LEFT_ICON) | (1 << FEATURE_RIGHT_ICON))) != 0) {
if (mIsFloating) {
layoutResource = com.android.internal.R.layout.dialog_title_icons;
} else {
layoutResource = com.android.internal.R.layout.screen_title_icons;
}
// System.out.println("Title Icons!");
} else if ((features & ((1 << FEATURE_PROGRESS) | (1 << FEATURE_INDETERMINATE_PROGRESS))) != 0) {
// Special case for a window with only a progress bar (and title).
// XXX Need to have a no-title version of embedded windows.
layoutResource = com.android.internal.R.layout.screen_progress;
// System.out.println("Progress!");
}
//...
//3 选定了窗口修饰布局文件 ,添加至DecorView对象里,并且指定mcontentParent值
View in = mLayoutInflater.inflate(layoutResource, null);
decor.addView(in, new ViewGroup.LayoutParams(MATCH_PARENT, MATCH_PARENT));
ViewGroup contentParent = (ViewGroup)findViewById(ID_ANDROID_CONTENT);
if (contentParent == null) {
throw new RuntimeException("Window couldn't find content container view");
}
if ((features & (1 << FEATURE_INDETERMINATE_PROGRESS)) != 0) {
ProgressBar progress = getCircularProgressBar(false);
if (progress != null) {
progress.setIndeterminate(true);
}
}
//...
return contentParent;
}
详细看一下这个方法。
根据不同的Style选择不同的Window布局文件。选Style的方式有两种:
通过requestFeature()指定窗口修饰符,PhoneWindow对象调用getLocalFeature()方法获取值
1
requestWindowFeature(Window.FEATURE_NO_TITLE);
为Activity配置相应属性,即android:theme=””,PhoneWindow对象调用getWindowStyle()方法获取值
1
android:theme="@android:style/Theme.NoTitleBar"
确定好窗口风格之后,选定该风格对应的布局文件,这些布局文件位于frameworks/base/core/res/layout/
确定了Window的Style后,mDecor作为根视图将该窗口布局添加进去,并且获取id为content的View,将其赋值给mContentParent对象。
将Activity的布局文件添加至id为content的FrameLayout内
这个步骤也解释了为什么在Activity中必须在setContentView之前调用requestFeature()方法
参考
What is an android window?
Android中将布局文件/View添加至窗口过程分析 —- 从setContentView()谈起